Sushi, with its delicate flavors and artful presentation, often conjures images of expertly prepared fish and intricate techniques. But what if we told you that you could enjoy the deliciousness of sushi rolls without any fish at all? This guide unveils the secrets to crafting incredibly tasty, entirely vegetarian sushi rolls, perfect for those avoiding seafood, adhering to a vegan lifestyle, or simply seeking a fresh and exciting culinary adventure. Forget the intimidation factor; making fishless sushi is surprisingly straightforward and rewarding, allowing you to customize your rolls with your favorite vibrant vegetables and flavorful sauces.
This simple, step-by-step guide will walk you through the entire process, from preparing the rice to the satisfying final roll. We'll cover essential techniques and offer creative filling suggestions, enabling you to create stunning sushi rolls that are both visually appealing and bursting with delicious plant-based goodness. Get ready to roll up your sleeves and discover the joy of creating your own delicious fishless sushi masterpiece!
Preparation and Safety Guidelines
- Sushi paper
- Bamboo place mat
- Sharp knife
- Wet dish rag
- Thoroughly wash all vegetables and fruits under running water to remove any potential contaminants.
- Ensure all utensils and surfaces used in preparing the sushi are meticulously cleaned to prevent cross-contamination.
- If using any pre-packaged ingredients (like sauces or seaweed sheets), always check the expiration dates and storage instructions to ensure freshness and safety.
Step-by-Step Instructions
Prepare the Rice
- Prepare sushi rice (or use regular rice with rice vinegar and sugar for a sweet and sour taste).

Prepare the Rice Assemble the Roll
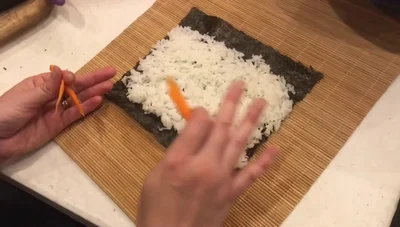
- Spread a thin layer of rice on the sushi paper, leaving edges open.
- Place carrot slices (or other desired vegetables) on the rice.


Assemble the Roll Roll the Sushi
- Fold the edge of the sushi paper over the filling. Use the bamboo mat to help roll tightly.
- Continue rolling, using the bamboo mat for support. Wet the last edge of the paper to seal it.


Roll the Sushi Cut and Serve
- Cut the roll into bite-sized pieces using a sharp knife. Wipe the knife with a wet rag to prevent sticking.

Cut and Serve
Read more: No-Bamboo Mat Sushi Rolling: A Quick & Easy Tutorial
Tips
- Use a bamboo place mat to make rolling easier.
- To prevent sticking, use a wet dishrag to clean your knife.
- Sushi paper can be found in most stores, even Walmart.


